
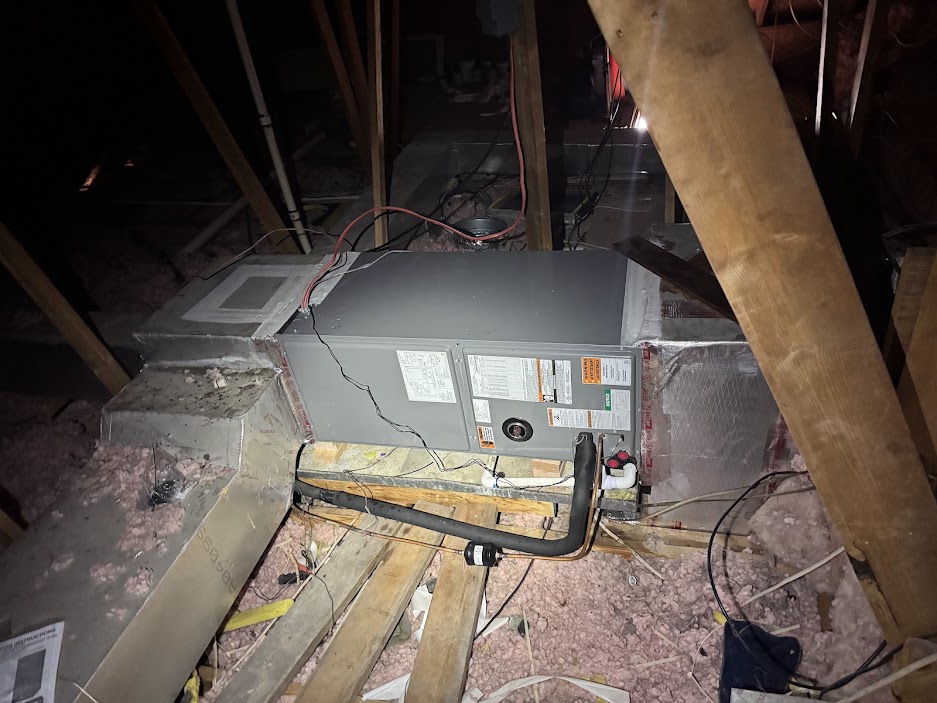
Buying high-efficiency air-conditioning equipment does not automatically guarantee lower energy bills, better comfort, or longer equipment life. The quality of the installation has a major effect on how well the system performs.
Even premium equipment can struggle when the ductwork leaks, airflow is restricted, refrigerant lines become contaminated, or the system is not properly charged and tested.
A complete HVAC installation involves much more than connecting an air handler and condenser. Each step must be completed correctly to protect the equipment and help it deliver its rated performance.
Proper Equipment Sizing Comes First
Before selecting a replacement system, the home’s cooling requirements should be evaluated.
Installing a larger unit is not always better. Oversized equipment may cool the home quickly but shut off before removing enough humidity. Undersized equipment may run continuously and still fail to maintain the desired temperature.
A professional installation should consider:
- A Manual J load calculation
- Manual S equipment selection
- The home’s insulation and air leakage
- Window size and orientation
- Occupancy and internal heat loads
- South Texas temperature and humidity conditions
- Existing duct capacity
Equipment sizing and duct capacity must work together.
No Gaps Between the Air Handler and Ductwork
The air handler must be properly connected and sealed to the return box, supply plenum, filter base, and surrounding ductwork.
Gaps around these connections can allow conditioned air to escape or hot, humid attic air to enter the system.
Air leakage near the air handler may cause:
- Reduced airflow at the registers
- Higher indoor humidity
- Longer AC run times
- Increased energy consumption
- Dust and insulation entering the system
- Condensation around the air handler or duct connections
Metal transitions should fit correctly, and connections should be sealed with approved materials. Tape alone should not be expected to correct a poorly constructed transition or a large gap.
Protect Refrigerant Lines Whenever the System Is Open
Refrigerant tubing should remain capped or sealed whenever it is not actively being connected.
Leaving copper lines open allows moisture, dirt, dust, and other contaminants to enter the refrigeration system. These contaminants may affect the compressor, metering device, oil, and refrigerant.
This is especially important during construction, when dust and debris may be present around the installation area.
Keeping the lines covered is a simple step that can help prevent serious long-term problems.
Flow Nitrogen While Brazing
Brazing refrigerant connections without flowing nitrogen can create oxidation inside the copper tubing. This dark internal buildup can break loose and circulate through the refrigeration system.
Contamination may restrict the TXV or other metering device and interfere with oil circulation.
Flowing a small amount of dry nitrogen through the tubing while brazing helps keep the inside of the refrigerant lines clean.
The outside of a brazed connection may look good while the inside of the tubing is contaminated. That is why proper installation procedures matter even when customers cannot see them.
Pressure-Test the System for Leaks
Before releasing refrigerant into the completed system, the refrigerant circuit should be pressure-tested with dry nitrogen according to the equipment manufacturer’s requirements.
A pressure test helps identify leaks at:
- Brazed joints
- Service valves
- Fittings
- Indoor coil connections
- Refrigerant-line connections
Finding a leak during installation is much better than discovering it after the system has lost refrigerant and stopped cooling.
Refrigerant should not normally need to be added repeatedly. If a system is low, the cause should be investigated.
Pull and Verify a Deep Vacuum
A vacuum is used to remove air, moisture, and non-condensable gases from the refrigerant system before it is charged and started.
Moisture left inside the system may react with refrigerant and oil, contributing to acid formation, corrosion, restrictions, and compressor damage.
A proper evacuation should be verified with a micron gauge. The system should also be isolated and observed to confirm that it can hold the vacuum within acceptable limits.
Simply attaching a vacuum pump for a set amount of time does not prove that the system is dry, tight, and ready for operation.
Charge the System According to Manufacturer Specifications
The correct refrigerant charge is necessary for proper cooling capacity, efficiency, humidity removal, and compressor protection.
The charge should be verified using the procedure required by the manufacturer. Depending on the equipment and operating conditions, this may include:
- Weighing in refrigerant
- Measuring subcooling
- Measuring superheat
- Checking indoor and outdoor temperatures
- Confirming proper airflow before adjusting the charge
Charging by pressure alone may not provide an accurate result.
An undercharged or overcharged system can cause poor cooling, longer run times, higher energy consumption, and reduced equipment life.
Set the Correct Blower Airflow
Airflow should be adjusted for the installed equipment and the home’s comfort requirements.
Too little airflow can cause:
- Reduced cooling capacity
- Evaporator coil freezing
- High static pressure
- Weak airflow from registers
- Longer run times
Too much airflow may cause:
- Excessive duct noise
- Reduced humidity removal
- Uncomfortable drafts
- Water being pulled from the evaporator coil
- Condensation or drainage problems
Blower settings should not be left at a default position without verifying how the complete system is operating.
Measure Static Pressure
Static pressure measures the resistance the blower encounters while moving air through the HVAC system.
High static pressure may be caused by:
- Undersized return or supply ducts
- Restrictive filters
- Dirty evaporator coils
- Small return grilles
- Closed dampers
- Poorly designed transitions
- Crushed or sharply bent flexible ducts
- Undersized registers
- Excessively long duct runs
A new AC system cannot perform properly if the ductwork cannot move the required airflow.
For example, replacing a 2-ton system with a 4-ton system does not double the capacity of the existing ducts. Ductwork designed to deliver airflow for approximately 2 tons of cooling may remain limited to roughly that airflow even after larger equipment is installed.
The result can be high static pressure, weak airflow, increased blower strain, and equipment that cannot deliver its full rated capacity.
Static-pressure testing helps determine whether the air handler and duct system are working together correctly.
Install the Drain System Correctly
The evaporator coil removes moisture from the air, and that water must drain safely away from the equipment.
The condensate system should have:
- Proper drain-line slope
- The correct trap when required
- Accessible cleanout points
- A properly positioned vent when applicable
- Secondary drainage or overflow protection
- Secure, leak-free connections
Incorrect drainage may cause water leaks, ceiling damage, microbial growth, system shutdowns, or water overflowing from the drain pan.
Verify Electrical Connections
Electrical installation affects both safety and reliability.
The installer should confirm:
- Correct voltage
- Proper breaker and wire sizing
- Secure electrical connections
- Correct disconnect installation
- Proper grounding
- Correct thermostat and low-voltage wiring
- Manufacturer-required overcurrent protection
- Proper heater-strip configuration when installed
Loose or incorrect electrical connections can create excessive heat, equipment damage, intermittent problems, or safety hazards.
Commission and Test the Complete System
The installation is not complete when the equipment turns on. Final testing should verify that the system operates correctly under actual conditions.
Commissioning may include:
- Supply and return temperatures
- Total external static pressure
- Airflow and blower settings
- Refrigerant charge
- Compressor and motor amperage
- Voltage
- Drain operation
- Thermostat configuration
- Heating and cooling operation
- Equipment staging
- Unusual noise or vibration
Recording these readings creates a performance baseline that can be useful during future maintenance and service calls.
Installation Quality Matters More Than the Lowest Price
A lower installation price may look attractive, but important steps require time, training, instruments, and attention to detail.
When these steps are skipped, the customer may later pay through:
- Higher utility bills
- Poor comfort
- High indoor humidity
- Repeated service calls
- Refrigerant leaks
- Airflow problems
- Compressor or blower failure
- Shortened equipment life
A properly installed standard-efficiency system may perform better and last longer than premium equipment installed incorrectly.
Professional AC Installation in the Rio Grande Valley
South Texas air conditioners operate through extreme heat and high humidity. Proper sizing, airflow, duct sealing, evacuation, refrigerant charging, and system testing are essential for reliable performance.
JL Cooling & Heating provides professional air-conditioning installation and replacement services throughout San Juan, McAllen, Mission, Pharr, Edinburg, and surrounding Rio Grande Valley communities.
We evaluate the complete system—not only the equipment being replaced.
Call 956-569-4838 or visit https://jlcandh.com to request an estimate.
JL Cooling & Heating
“We don’t sell what you don’t need.”